This is part one of a yet to be determined number following the progress of restoration of the Sinclair C5 that I previously introduced (You should go and read that post first if you haven't done already).
The first thing I wanted to do with the vehicle was to strip it down to gain access to the chassis, or Y frame as it is known, to determine the condition of it. I knew that this particular C5 has been in storage for some time, although not directly exposed to the elements, so I was hoping any rust will be minimal (surface level is to be expected).
Taking the C5 apart
I'm not going to do a full write up on how to take the Sinclair C5 apart as a) I forgot to take photos, and b) Dave over at RetroWorkshop has already created an extensive strip down guide available to read here (with an accompanying video available to watch on YouTube). However I will share with you some struggles encountered.
Removing the boot, wheels, drive gears and motor drive belt was all reasonably straight forward, and I was able to check the first couple of bearings associated with the rear right wheel. Generally they were ok, the ball bearings were all still round but any grease had long since washed away, there was some dirt on the bearings and so these went into a bath of brake cleaner (they are the only bearings I've cleaned so far, others I will do later). I removed the cover to the control box and disconnected the motor wires ready for it to be withdrawn from the vehicle. The interior of the control box looked to be in good condition with no evidence of corrosion on the PCB, even the connectors seemed to be in good condition. I can't however comment on the lower part of the control PCB as this is behind a part of the control box which is ultrasonically welded shut. Behind this part of the enclosure is the relay that provides 12V to the motor when the throttle button is pressed.
Back to the strip down and next was the rear lighting assembly. I have saved the bulb, however I'm going to swap it for an LED bulb. This bulb appears to be a standard 501 automotive bulb (Also referred to as W5W) and are readily available from automotive stores. There's two screws that sit under the rear light assembly that connect the bodywork/shell to a supporting frame. I was surprised to see that these screws had rusted as they didn't appear to be directly exposed. This is a common theme that replicates later throughout throughout the strip down, and it brings me onto a rather interesting point.
To replace, or not to replace?
There will be purists out there that would insist that all original parts are kept, restored and reused. I get it, I can understand. However, I don't have the resources to restore all the parts I take off, and some parts do have a limited lifetime (such as bulbs, brake pads etc). I don't like throwing things away, but when it comes down to hardware (screws/bolts) I have to draw a line. In my opinion it is far better to replace these components with new in order to ensure the vehicle is able to run long into the future. Yes I will try to use as much as I can, especially the bearings as some replacements of these are becoming scarce, but fundamentally my goal is to get a working functional vehicle that will continue to run for years.
My partner described the perfect analogy... here in the UK we have the National Railway Museum which has many many historical locomotives in its collection. The museum's focus is on preserving those locomotives, the parts, the material... exactly as they were built and operated (and sometimes modified). To run these locomotives today would require extensive overhaul and the replacement of many parts to non-original re-engineered solutions. This is not preservation of the loco. If you want to experience a running preserved locomotive, that's what the heritage railways are for. They're not as concerned about keeping original parts as they want to operate their engines. A heritage railway preserves the spirit, and that's what I'm going for here. I want to focus on that spirit of a running C5, and that will mean sacrificing original parts.
Towards the front of the C5
Removing the motor brackets and rear axel was all easy enough and soon the chain was split and removed too. Attention turned to the front of the C5, particularly the handle bars. This is where the strip down started to get tricky. The brake levers are clamped to the handle bars with a rear plate and bolt. This bolt was rusty and it was difficult to remove the nut clamping the brake lever to the handle bar, it did come free, but only because I sheared the bolts on both the left and right sides of the handle bar for the front and rear brakes. Moving on, there is a cone shaped nut that sits within the chassis to prevent the handlebars from being lifted out of place during regular use. It seems to be that this nut can be a particularly tight fit, and some persuasion with a calibrated tool (i.e. rubber mallet) is usually required to release it. Turns out the cone nut on my C5 had collated rust from the handle bar assembly and had seized in place. I believe that the reason why this nut was eventually freed is due to the copious amounts of penetrating oil and shock freeze that was sprayed around the nut. Actually removing the handlebars wasn't immediately straightforward either, again due to rust build up. This theme pretty much presented itself throughout the remainder of the strip down with the front wheel fork also being somewhat difficult to remove. Taking the pedals off the crank axle needed some careful positioning with the spanners in order to not loose a finger, but after this was done the axle was withdrawn with little fuss. It was at this point I discovered the only bit of grease that hadn't dried out, a rare sight. Inspecting the pedals and it's clear that the bearings within the pedals themselves aren't in the best condition and I'll need to look into this further. There's some corrosion on the cranks, but this will easily be sorted with a wire brush (I expect). The front wheel was taken off the forks and I took the opportunity to also remove the front brake calliper as this was rusty.
The chassis is free
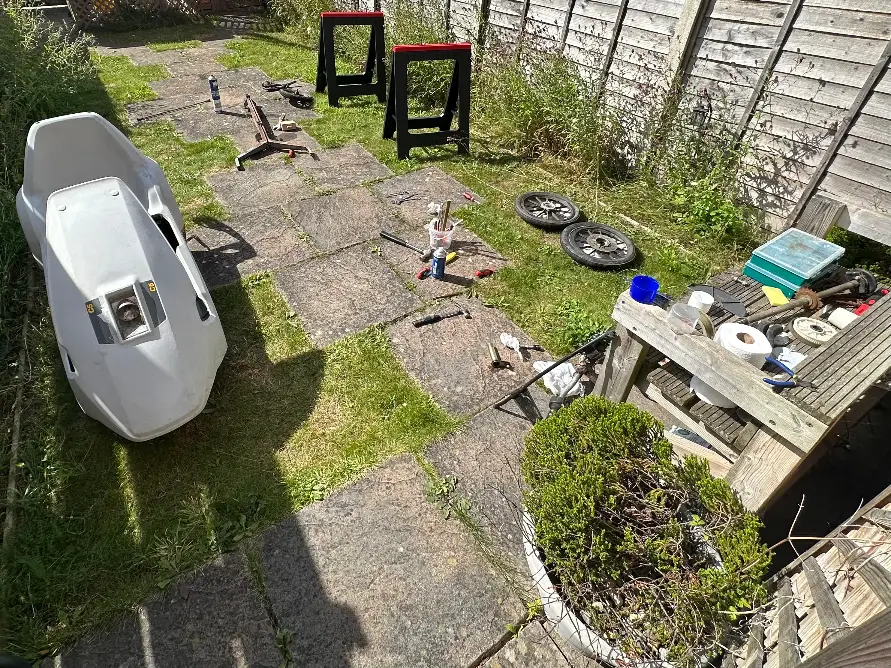
Eventually all parts were nearly back to component level, and the chassis was free to be taken away. There's quite a bit of surface rust, but nothing too serious. I have since taken the chassis and rear supporting frame to a local powder coating company for shot blasting and powder coating. I've been told this will take a couple of weeks as they fit bike frames, radiators, etc between the restoration of alloy wheels and a rough estimation of £120 exc VAT. I will update this post with final timescales and prices when the chassis returns.
Thank you for reading
There's still lots of work to be done on the C5, not least putting it back together. There's a lot of hardware that needs replacing, and parts that need the rust treating. If you wish to keep up to date with developments on this restoration project, consider subscribing to the blog RSS feed. There's more information on how to do that here.
If you enjoyed this post and you'd like to show your appreciation with a financial donation, you can buy me a coffee at this link, or by using the button below.
Thank you for reading,
Rachel x


This post has been tagged with the follwing tags: