I needed a way to link two machines together on separate networks without coupling the entirety of those networks together. Enter Headscale, a self hosted Tailscale control server.
The problem
I have a Synology NAS drive at home and I would like to use it to store data from other self hosted applications, such as Paperless NG. However my Proxmox server, with docker, is located at my girlfriend's house. The NAS drive and server are therefore both on physically separate networks. I do run WireGuard VPN servers on both of these networks as this allows me to login to various software remotely (I have a couple of Raspberry Pis on my home network), but this exposes all devices on the network and makes them accessible. I want a solution where only select devices are available, and whilst this may be possible with WireGuard (I haven’t looked into this), I know that Tailscale is exactly what I’m after.
What is Tailscale?
Tailscale is a software mesh VPN system offered by Tailscale Inc. It creates a peer to peer connection using WireGuard as the base protocol, effectively creating tunnels between machines in a network (called Tailnets). It's a very simple piece of software to use, and doesn't require any network configuration changes to be made by the user (i.e. Router port forwarding). Tailscale have an in-depth explainer ![]() on how the system works on their website
on how the system works on their website ![]() .
.
Put simplistically (as a non-networking professional/casual tinkerer), Tailscale creates a "virtual LAN" using the wider WAN internet connection. You may have come across LogMeIn Hamachi ![]() in the past when checking out Minecraft servers, Tailscale to the end user provides the same functionally (at the surface at least).
in the past when checking out Minecraft servers, Tailscale to the end user provides the same functionally (at the surface at least).
Basic operational overview as an end user
Firstly, Tailscale offer an all-in-one solution ![]() and there is no requirement to self-host anything (I'll come to that in a moment) so I will use this to demonstrate how a typical end user would likely use the service.
and there is no requirement to self-host anything (I'll come to that in a moment) so I will use this to demonstrate how a typical end user would likely use the service.
The following guide using Tailscale's all-in-one solution was correct at the time of publication and may differ. This post will not be updated to reflect changes. Please refer to the Tailscale quickstart
for additional information
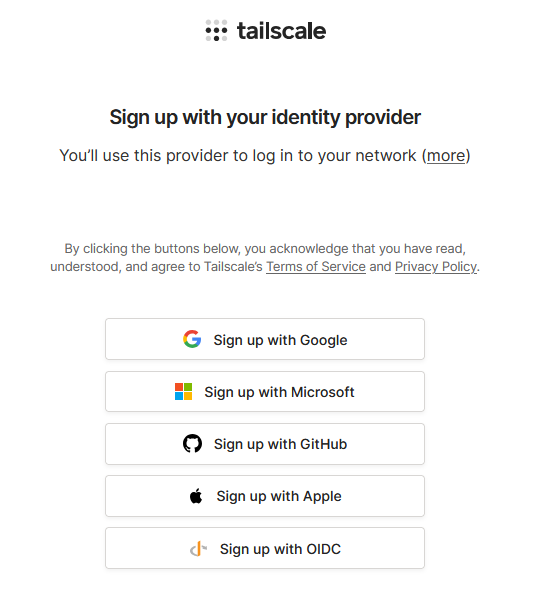
First, head to the Tailscale website ![]() and click on the "Get Started" button. You will then be asked to choose an identity provider to sign up. An identity provider is a fancy term to describe a login service that provides authentication features and so the vendor (in this case Tailscale) doesn't have to implement their own identity system (Indeed, Tailscale does not allow you to sign up with just an email and password, you have to use an identity provider). Choose an identity provider for a company you have an account with, such as Google, Microsoft or Apple.
and click on the "Get Started" button. You will then be asked to choose an identity provider to sign up. An identity provider is a fancy term to describe a login service that provides authentication features and so the vendor (in this case Tailscale) doesn't have to implement their own identity system (Indeed, Tailscale does not allow you to sign up with just an email and password, you have to use an identity provider). Choose an identity provider for a company you have an account with, such as Google, Microsoft or Apple.
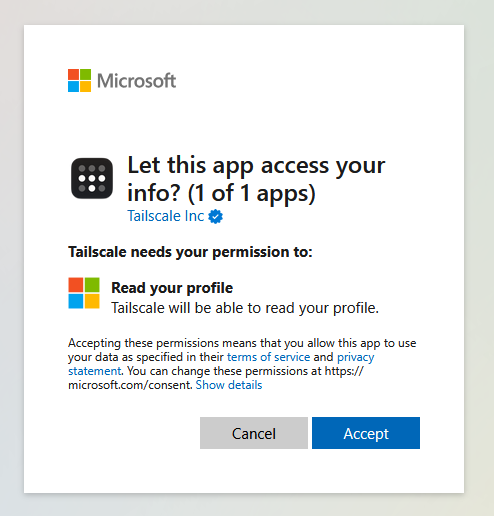
You will then need to allow permissions for Tailscale to use your profile from the identity provider, this will look different depending on which identity provider you choose (Microsoft is shown in this example).
You will then be taken through Tailscale's onboarding process, firstly choose how you are going to be using Tailscale. In this example I am a home user, using Tailscale for personal use.

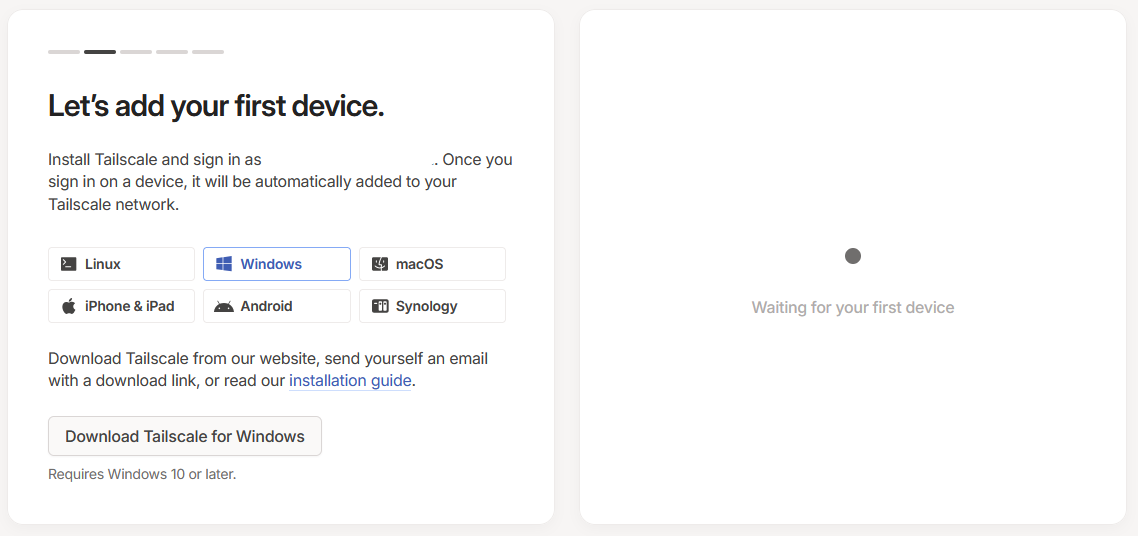
You then need to add your first device, to do this, download the Tailscale client app onto a device of your choosing. This will depend on which device you are using/wish to connect to the Tailscale VPN and I won't go through the steps here on how to install each client. You can however find all the details in the Installation Guide ![]() provided by Tailscale
provided by Tailscale
Once you've logged into the Tailscale client, the onboarding screen will then ask you to connect a second machine
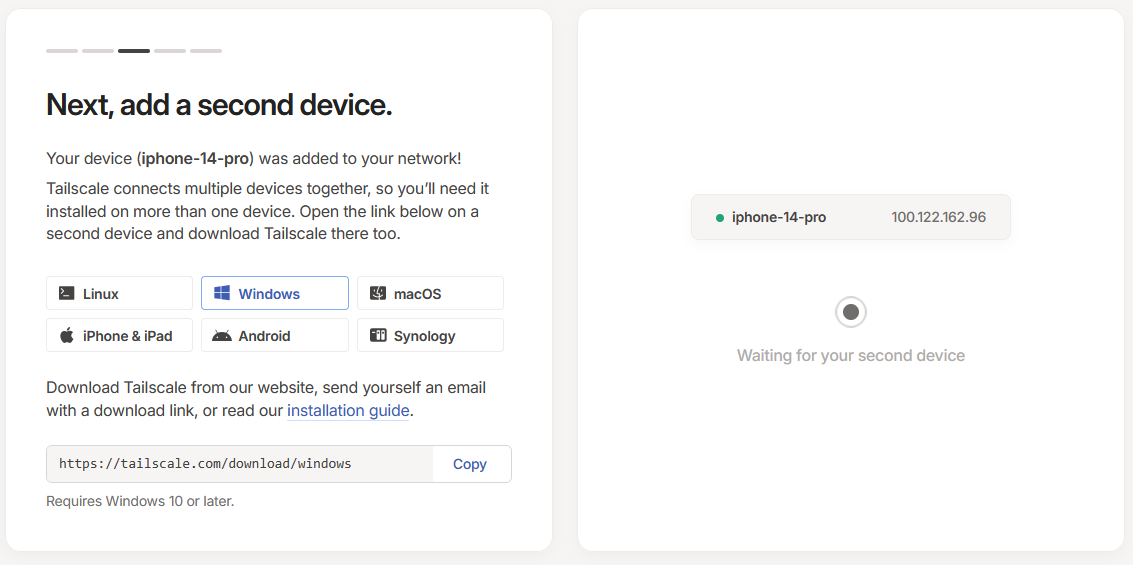
When you've connected a second machine, you'll be presented with a ping command that you can use to check that your devices have connected to the Tailscale network successfully. Notice how each connected machine has it's own unique IP address, this IP address is one you can use to directly connect to that machine over the Tailscale network
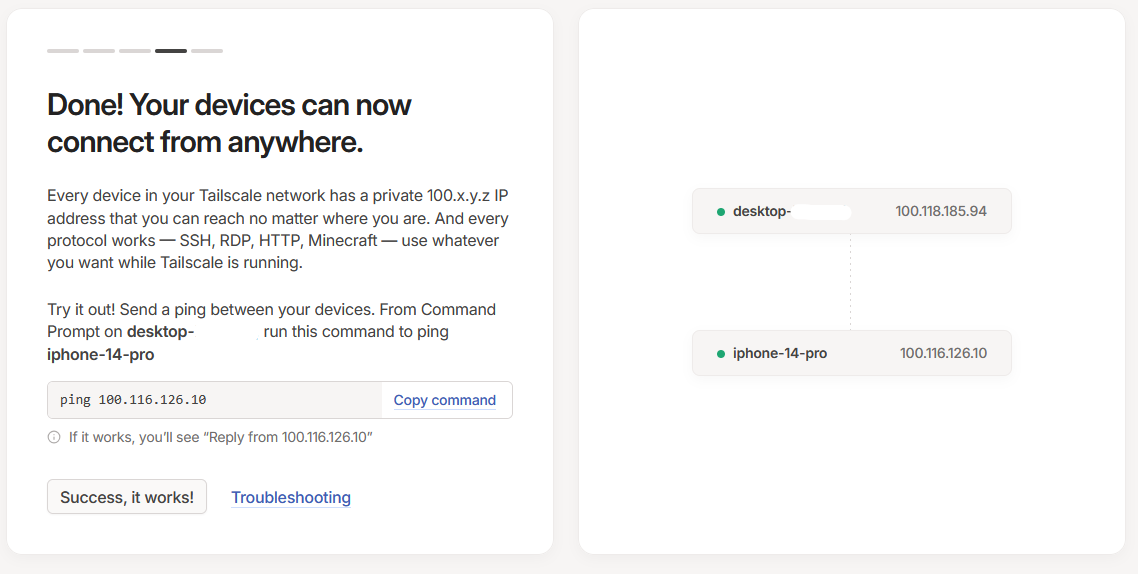
For example, when I carry out a ping on my iPhone from my desktop computer, this is the response I get:
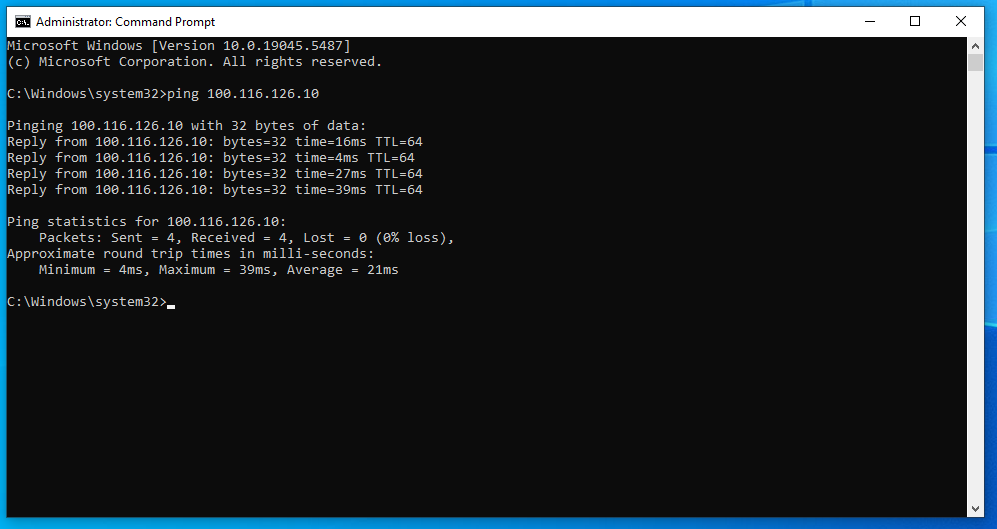
As I am getting replies from the remote machine, I can continue to click on the "Success, it works" button back on the onboarding screen.
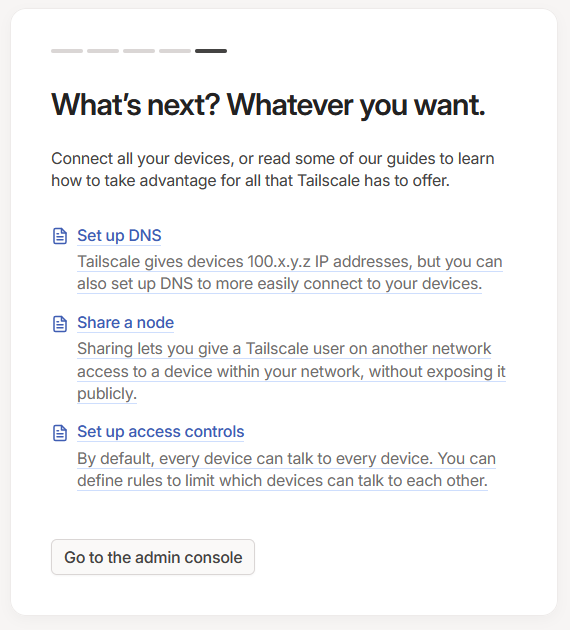
Finally you'll be presented with some links to various guides of additional functionality within the Tailscale network, such as changing your DNS settings to then be able to access connected machines via a domain name. Finally, click on the "Go to the admin console" button
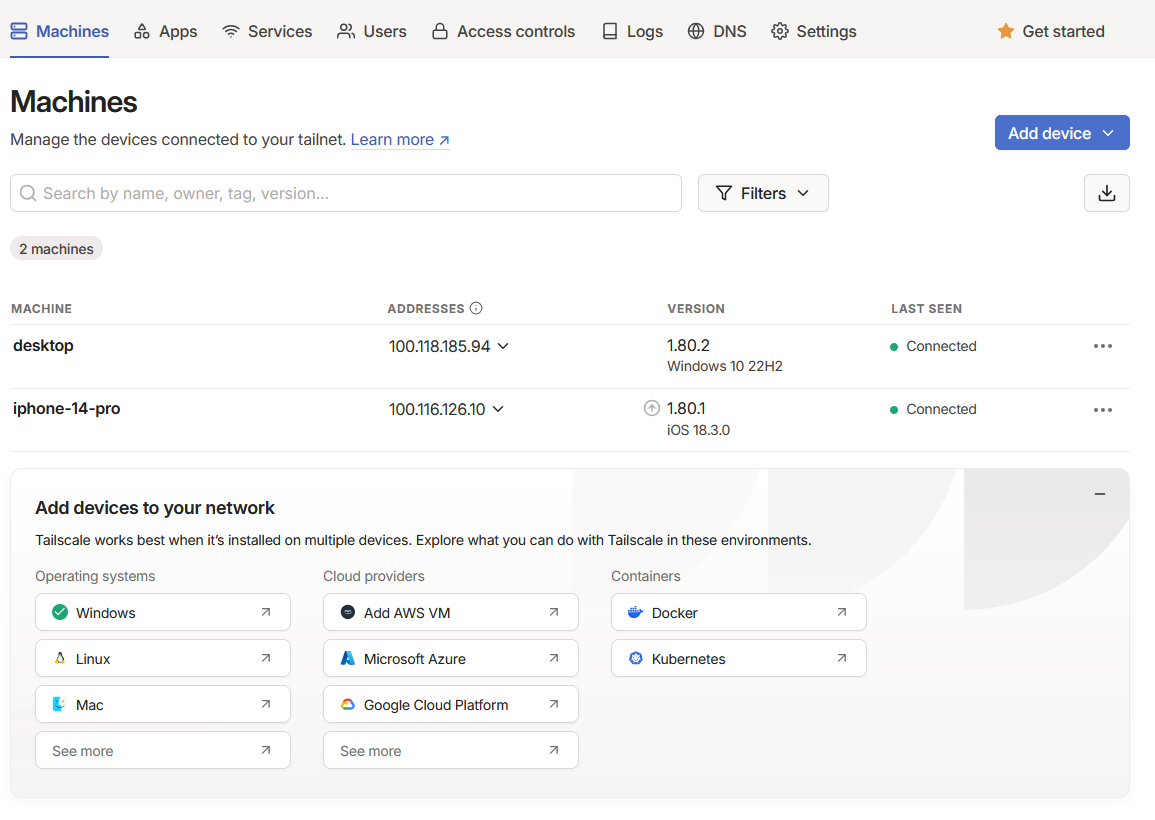
This will then take you to the admin console where you can see all the devices connected to your newly created Tailscale network (Tailnet)
Even the free tier of Tailscale is generous in its offerings, additional guides are available in the knowledge base ![]() . However, for the casual user the default settings will suffice. Continue to add additional machines to your Tailnet by simply downloading the client and logging in.
. However, for the casual user the default settings will suffice. Continue to add additional machines to your Tailnet by simply downloading the client and logging in.
Self-hosting Headscale
Parts of the Tailscale system are open source, and others are closed source. The client apps for example are closed source, as is the control server. The client apps do allow to use a custom login server (control server) so we can utilise these, however the control server is also closed source. Enter Headscale
Headscale ![]() is a open source implementation of the Tailscale control server that we can self host and it allows us to create a single Tailnet that we can connect to using Tailscale's official client applications. The project is very much still in the development phase, with GitHub suggesting that the project is around three years old at the time of publication, however the basic functionality of being able to assign an IP address to connected machines is present and that's all I need right now.
is a open source implementation of the Tailscale control server that we can self host and it allows us to create a single Tailnet that we can connect to using Tailscale's official client applications. The project is very much still in the development phase, with GitHub suggesting that the project is around three years old at the time of publication, however the basic functionality of being able to assign an IP address to connected machines is present and that's all I need right now.
Documentation ![]() is available for Headscale, including installation guides and how to use a Docker container to run the server. In this post however I want to demonstrate what I had to do to get Headscale to work when running it within Docker, and using Nginx Proxy Manager
is available for Headscale, including installation guides and how to use a Docker container to run the server. In this post however I want to demonstrate what I had to do to get Headscale to work when running it within Docker, and using Nginx Proxy Manager ![]() . If you don't wish to use Docker to run Headscale, please refer to the documentation pages
. If you don't wish to use Docker to run Headscale, please refer to the documentation pages ![]() .
.
Note: At the time of writing, the following versions of software were in use: Headscale: 0.24.3, Headscale UI: 2025.01.20, Nginx Reverse Proxy Manager: v2.12.1 The steps outlined below may therefore differ in newer releases. Check the documentation
Creating the Headscale Docker containers from a Docker Compose file.
Firstly, in order to make it somewhat easier to manage the Headscale control server, I will also be installing a Headscale UI Docker container. I prefer to keep track of containers running as a service by using a Docker compose file to create a stack (for me I do this within Portainer).
Use the following as the Docker compose file and start is as you would with any other stack (docker compose up command):
version: '3.5'
services:
  headscale:
    image: headscale/headscale:0.24.3
    container_name: headscale
    volumes:
      - ./container-config:/etc/headscale #This is the location of where the Headscale config.yaml is stored
      - ./container-data/data:/var/lib/headscale
    ports:
      - 28080:8080 #Headscale will be listening on 8080, for this example we're going to map that to  port 28080 on the host.
    command: serve
    restart: unless-stopped
  headscale-ui:
    image: ghcr.io/gurucomputing/headscale-ui:latest
    restart: unless-stopped
    container_name: headscale-ui
    ports:
      - 8443:8443 #This is the port Headscale UI runs the web interface on. You can map 8443 to any port you wish. For this example I will leave it as is.
Setting up the Headscale configuration file (config.yaml)
If you inspect the logs of the Headscale container after starting the containers, you will see an error saying that the configuration file is missing. You will need to save the contents of the GitHub example configuration file ![]() to ./container-config (or wherever you have specified in the Docker compose file). Note, the example configuration file appears to change between each release of Headscale, so be sure to choose the correct configuration file for the version you're running.
to ./container-config (or wherever you have specified in the Docker compose file). Note, the example configuration file appears to change between each release of Headscale, so be sure to choose the correct configuration file for the version you're running.
We need to modify the configuration file in order for us to be able to fully use Headscale. On line 13 locate server_url: http://127.0.0.1:8080 and replace this with server_url: http://example.com:80 where http://example.com is the domain at which your Headcale server will be accessed (including subdomains). Be sure to keep the port of 80 though.
Uncomment line 18 (listen_addr: 0.0.0.0:8080) and comment line 19 (# listen_addr: 127.0.0.1:8080) These are all the changes we need to make to the configuration file. Feel free to go through the remainder of the file and make changes as you wish. Be sure that line 208 however is kept as tls_letsencrypt_hostname: "" so Headscale doesn't attempt to create a TLS certificate (we're going to do this though Nginx Proxy Manager instead).
Setting up Nginx Proxy Manager
This guide assumes that you already have Nginx Proxy Manager ![]() installed, with an owned domain pointing at your Nginx Proxy Manager instance.
installed, with an owned domain pointing at your Nginx Proxy Manager instance.
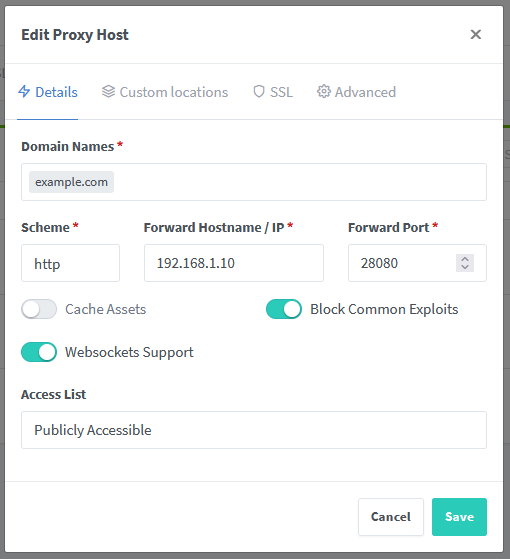
Log into Nginx Proxy Manager and go to the list of proxy hosts, Then click on the "Add Proxy Host" button. On the details pane, add the domain that your Headscale server will be accessed at (the same address you entered on line 13 in config.yaml) to the Domain Names text box. Set the scheme to http and specify the IP address of the local machine that is running the Headscale Docker container (192.168.1.10 in this example) in the "Forward Hostname/IP" text box. Select the forward port to whatever port you've mapped on the host machine to the 8080 port of the Headscale Docker container (28080 in this example, see the Docker compose example above). Turn on both "Block Common Exploits" and "Websockets Support."
Now click on the SSL tab. In the SSL Certificate dropdown menu, choose "Request a new SSL Certificate" and enable "Force SSL", "HTTP/2 Support", "HSTS Enabled" and "HSTS Subdomains." LetsEncrypt will require an email address to generate a new SSL certificate, enter this in the "Email Address for Let's Encrypt" text box. Read and acknowledge the terms of service. Click Save and allow Nginx Proxy Manager/LetsEncrypt to generate a new SSL certificate for you.

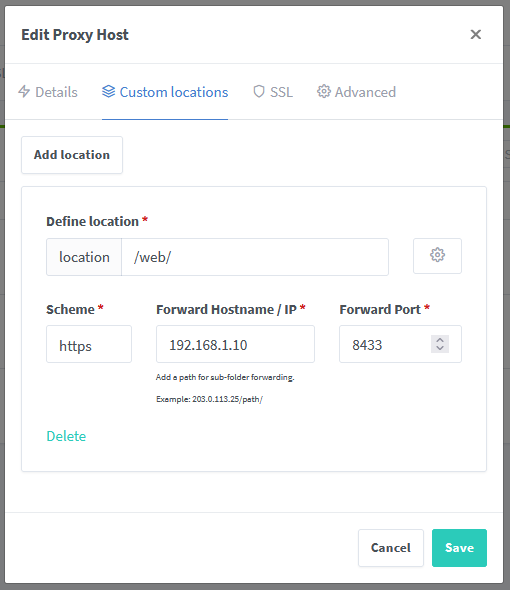
Edit the entry that will have just been created and click on the Custom Locations tab. Click the "Add location" button. In the subsequent section that appears, enter into the "Define location" text box /web/. For the scheme choose https and in the "Forward Hostname/IP" text box enter again the IP address of the local machine that is running the Headscale Docker container. In "Foward Port" enter the mapped port for port 8443 of the Headscale UI Docker container (8443 in this example, see the Docker compose example above). Once complete, click on the Save button.
Try to navigate to the URL you are using for the Headscale instance (example.com) the browser should connect to a blank page, now try navigating to /web/ (example.com/web/), you should be greeted with the Headscale UI web interface.
Setting up Headscale UI
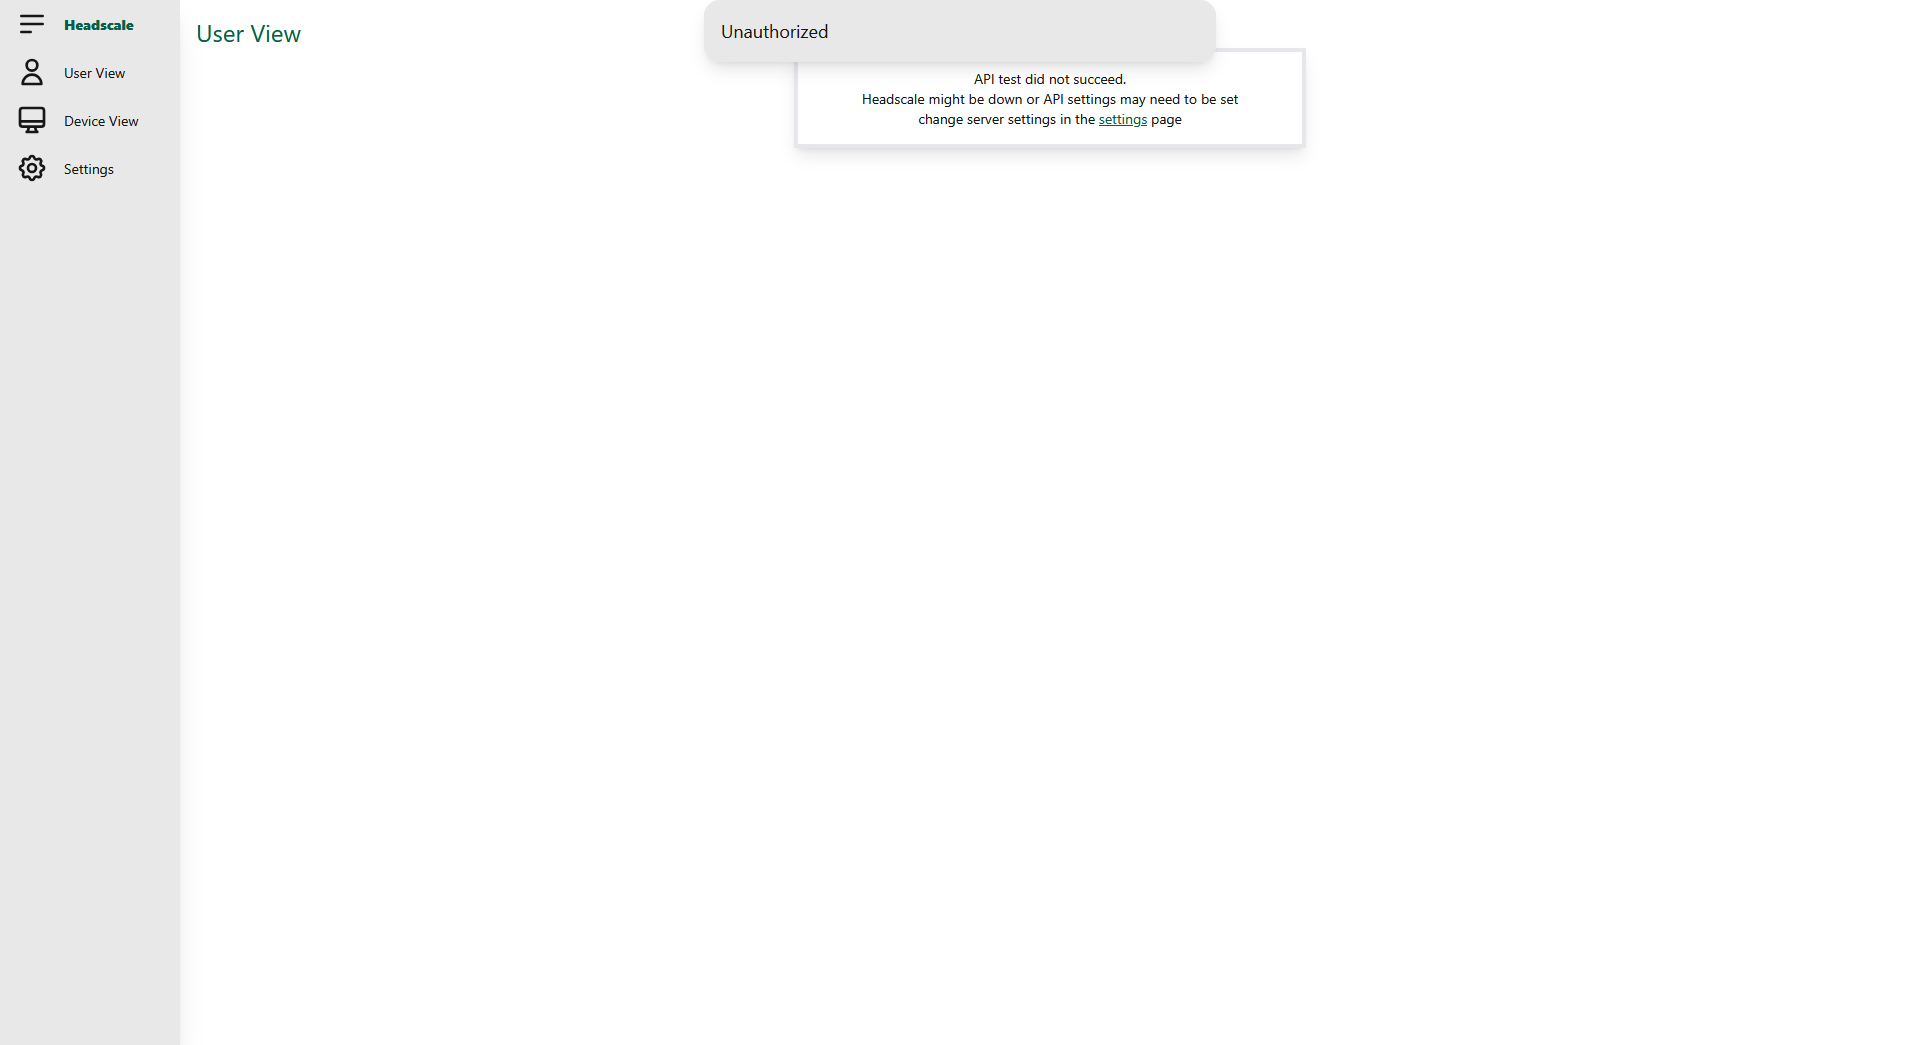
In order for the Headscale UI to be able to control the Headscale server, we need to provide an API key to the interface (You will have noticed the "Unauthorised" message at the top of the screen). We need to generate this key via the Headscale container. I find it's easier to do this in the command line (or via SSH) of the Docker container host machine.
Open the terminal of the Docker host machine and enter docker exec -it headscale headscale apikeys create -e"90d" where the first instance of headscale in the string is the name of the Docker container as specified in the Docker compose file. This will generate an API key for you, save this somewhere for now. Note that the API key is set to expire after 90 days (That's the -e "90d" flag) and so when it does expire, you'll need to generate a new API key. You will end up collating API keys and it would be a good idea to delete expired keys when they are no longer needed. To do this, you'll need to find the prefix of the API key by using docker exec -it headscale headscale apikeys list which will show you all the generated API keys, then use docker exec -it headscale headscale apikeys delete -p "<PREFIX FROM LIST>" to delete the key.
Now, back in the Headscale UI web interface, click on the "Settings" tab, in the "Headscale URL" text box enter the URL in which the Headscale instance is accessible at, this is the URL/Domain Name you entered in Nginx Reverse Proxy. Now in the "Headscale API Key" text box, paste in the API key you have just generated. Click on the "Test Server Settings" button and the red cross should change to a green tick mark. We can now begin to add machines to our Tailnet being managed by Headscale
Adding machines to the Headscale network
Using the Headscale UI web interface makes it easier to manage users and machines and so we will set up machines this way. Firstly navigate to the Headscale UI web interface if you are not already there and click on the "Users View" tab. Click on the "+ New User" button and enter a username into the text box that appears, then press the check mark to create the user. We later will assign machines to a user. At the time of writing, a user doesn't login to the Headscale network in the same way as described above for the regular Tailscale service, but machines still need assigning to a user when they login.

Now we can attempt to connect a Tailscale client application to our new Headscale Tailnet. The method on how you do this depends on which client you're using and this is explained in the Headscale Documentation ![]() (Use the Windows guidance for Linux). Whichever client you use, and the required steps to use a custom server, you will eventually be greeted by a webpage that looks like this:
(Use the Windows guidance for Linux). Whichever client you use, and the required steps to use a custom server, you will eventually be greeted by a webpage that looks like this:

On this page, Headscale pre-generates a command you can use to enrol the machine onto the Tailnet, as we are going to use the Headscale UI web interface to do this, we need to note down the machine key, which is all text following --key (including mkey:)
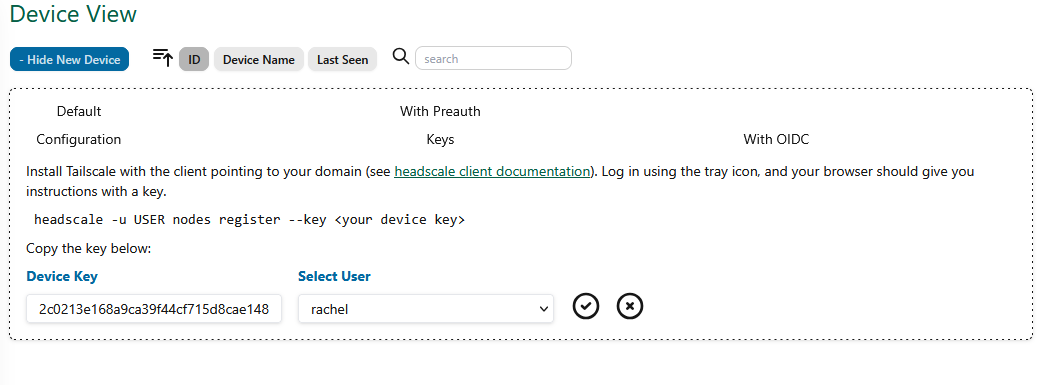
Head back to the Headscale UI web interface and click on the "Device View" tab. Now enter the machine key you have just noted into the "Device Key" text box and choose a user to attribute this machine to in the "Select user" drop down. Click on the check mark to enrol the machine onto the network.
Once this device has been enrolled, you should see a green counter next to the name of the device. You can always rename the device, and change the user by clicking on the edit button.

Carry out the same procedure as many times as required for the machines you wish to connect to your Tailnet.
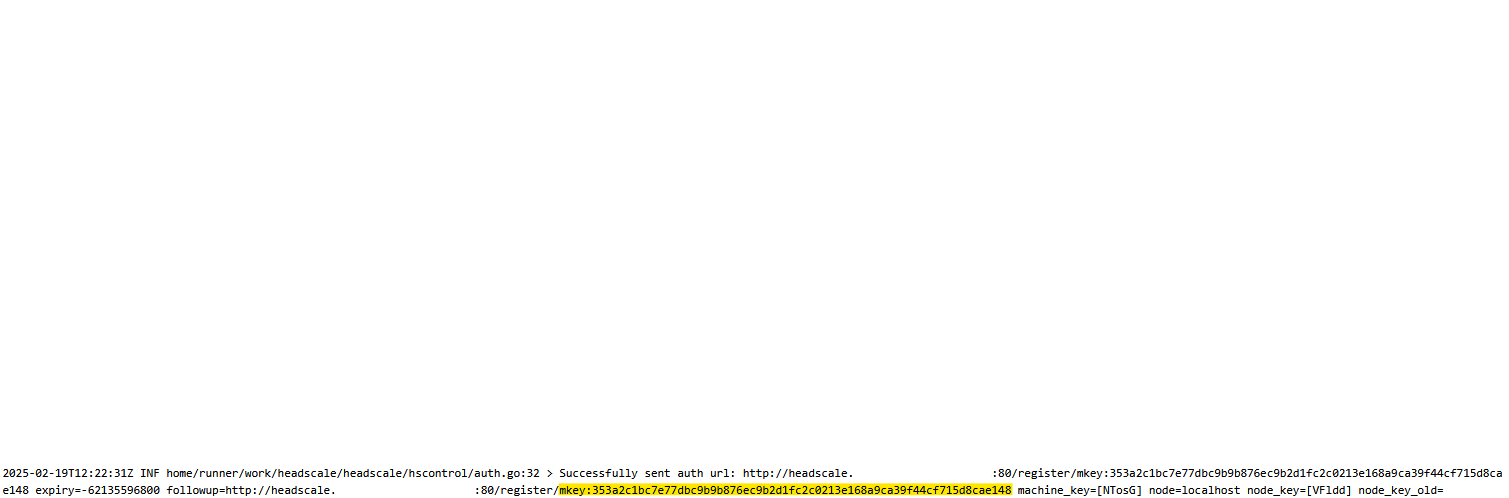
You may find that sometimes the webpage generated by Headscale showing the machine key doesn't load (from my experience it takes a long time on iOS and doesn't appear to load at all on Windows). If you are registering a single device at a time, you can find the machine key for the newly connecting device within the Headscale Docker container logs. Again you can copy the mkey: ID from here and paste it into the Headscale UI Device View tab as described above. This however is not good practice as if you have multiple machines trying to connect to the Tailnet, you could potentially enrol the wrong device. For a small Tailnet in a homelab environment however, this risk is unlikely.
Other options
In reality running the storage medium on a separate network to the server is a far from ideal set up. The best way to link the NAS and server together would be for them to both be on the same network in the first instance, that or giving the server enough storage space to keep the data saved on the local machine.
Additionally, as mentioned previously, Tailscale uses WireGuard technology for its VPN architecture, and so the functionality of achieving a tunnel to a single remote machine is probably possible. I haven’t looked into this as I knew Tailscale would achieve what I needed, so why reinvent the wheel (yes, I understand the irony in that statement by then self hosting the Tailscale control server).
Of course, you could just use the all-in-one solution offered by Tailscale themselves, and for most casual users this would be more than adequate. Of course there is also the alternative long-standing LogMeIn Hamachi, although this service has more restrictions on the free tier.
I hope that this post has been helpful to you if you have been looking to self-host Headscale.
Rachel x
Disclaimer: I am not an IT or cybersecurity professional, I do not have extensive knowledge in computer networks, the highest level of understanding I have is A-Level computer science from 2014. I am not Cisco qualified, or hold any qualifications regarding IT, Computer Science, Networking etc. I am a hobbyist at best. Some of the information above may not be accurate, it may not be best practice and it may not be secure. The information shared is from my own experiences and you are recommended to carry out your own research. Information and guidance is correct at the time of publication and is likely to change. I cannot be held responsible for any data loss or other cyber related incidents. "Don't believe everything you read on the internet" ~ Abraham Lincoln

![]()
This post has been tagged with the follwing tags: